Showing posts with label tutorial. Show all posts

Thursday, September 22, 2016

Painted blocks and my newly decorated mantel

I love fall, and it is finally not so hot in NY. Still in the 80's some days but not humid anymore and nights are cool enough to sleep now. But it's late September and should be cooler. My daughter loves fall even more than I do apparently and she has gotten me into the mood to decorate......so here's my first of many fall posts. 

Materials:
2 rectangular blocks (i used my carving blocks and after the season i plan on carving them into birds)
Acrylic Paints in brown, off white, orange and gray
Pencil
Liner brush and medium brush


Step 1: gather supplies and get sidetracked right off the bat by the cat playing on your table.
Step 2: paint the edges of the blocks a dark brown.


Step 3: paint over the whole block in a parchment or off white. Mine wasn't dry yet so the brown smeared into the white. If yours dried quickly you can wipe the white off here and there with a baby wipe.


Step 4: draw the words you choose on each block in pencil.
I almost wrote "give thanks" but decided on "pumpkin spice" instead. Something even more random would be fun too..."candy corn" or "crunchy leaves" or "cider and donuts"or "caramel latte".... Whatever makes you think of fall....


Step 5: paint over the words in gray with your liner brush.


Step 6: draw lines for a border with your pencil, and add orange dots or squiggles as accents. 


I'll show you how I made the little green pumpkins soon. 


Happy PPF!

Little green pumpkin tutorial

I said I would show you how to make the little pumpkin I posted a few days ago with two newly decorated mantel. It's not complicated or all that unique but it was a quick fun fall decoration. So here it is......

Materials: 
1/2 yard of any fabric, (I used scraps of green linen)
Hot glue gun
Twigs clipped from outside
Polyester fiberfill
Needle and thread
Twine or cord


Easy step #1:

Trace a large plate and a small bowl (anywhere around 12" diameter for the large pumpkin,and for the tiny pumpkin I traced a candle about 4" diameter.)


Easy step#2:
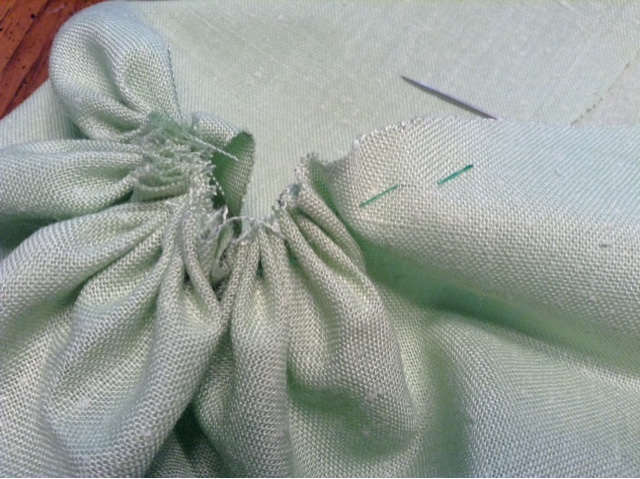
Cut it out on the line, and run a loose stitch about 1/4" from the edge.


Easy step #3: pull your stitches tight. 


Easy step#4: stuff each pumpkin, and sew the opening closed. I wrapped more green three around the larger one to make the sections of the pumpkin.


Clip a stem from a branch outside or use a cinnamon stick and hot glue it to the top of the pumpkins. Tie a piece of jute or raffia to the stem.


Wednesday, August 17, 2016

How to easily design your own fabric on Spoonflower


I should probably say I am not affiliated with Spoonflower and don't make any money by promoting their website. I just really enjoy designing my own fabric there, and want to share how easy it is!

But first I do have a link you can go to which will take you to a sweepstakes at Spoonflower in coordination with Plum Print..... You can win a custom hardcover 13x11 art book with up to 30 pieces of your child's or your artwork plus $100 in spoonflower credit!
Just click here to enter! 

There are so many ways to design fabric using the tools on Spoonflower website but I believe this one is the easiest by far. You don't need photoshop or any special art tools!


Start with a tiny notebook or an index card.
With any type or color pen draw a small figure. Think cute animals, faces, flowers, fruit, bugs or geometric shapes.......
Go over some of your lines to darken them in a little.
You might even be able to use an image you already have in your sketchbook.


Take a photo of it as close up as possible, or scan your image. (If you are using a camera then try to take your photo in bright, even, natural light, so your background appears all white and not gray on one side and lighter on the other, and hold your camera as level as possible.
If you didn't take your photo with your IPad or iPod or iPhone, and it is not already in whatever device you will use to upload it to the Spoonflower website, then download your image now to your computer using the camera card. 
Crop if needed to remove any edges of the card or notebook that show and to have less white space around you image.


Log into spoonflower.com
Upload your image to spoonflower by clicking on 'add a design'
Click on 'change colors' on the left of your uploaded design.
Click on 'advanced changes' then on '2 colors'
Once the site has broken your image down into just two colors you can change the color of the lines and/or the background by clicking on the square box of color you want to change, and then click on the color from the color choices that you want it to be. For example change your white background to a light blue or peach. Leave you lines the color they were drawn in or change them to a darker black or any other color. You could even make the lines white if you made the background color dark enough. You can easily experiment because if you don't like it, just hit cancel.
Once you are satisfied, Click 'save'


You will be directed back to your design page in your design library. There you can alter it further with the tools at the right of your image........
1. by choosing design size (there is a ruler at the top of your design to show you how big it is. Pay attention to this as it is easy to misjudge the size.)
2. by changing the repeat. There are 5 types. I used half drop. Just click on each one to see how they change the look of the image.
3. by changing the fabric type.
4. by changing the fabric size for your order. I like to change this to swatch size to see how the image will look close up at 8x8 inches.
And 5. Below the image are extras.....You can name your design, add tags, make it public (if you want to either sell it once you have previewed it or if you want to have household items created for you from your design etc.)
You are ready to order!


Or ......
You can now go to roostery.com, which is a site that is connected to spoonflower that sells housewares sewn with spoonflower designs, yours or other designers.  You can get there from the "shop" tab in spoonflower, then click on rookery, the sign in using your spoonflower usernames. Once there you automatically have your own "shop" if you have any public designs in spoonflower, to see it click on "my designs".
You can preview your designs on napkins, pillows, linen towels etc. and order them there so that someone else will do the sewing for you!


I didn't include any photos but you can also order your fabric printed on clothes patterns at the site 'Sprout.com' by clicking on sprout under the shop tab. They also have a program where they will sew the pattern up for you as well. So cool!

Of course, if you want my designs on the pillows above instead of creating your own you can get to my roostery account here, or you can go to my spoonflower account from the links on the right of my blog.

Thanks for visiting! 
And last week i said i may stop linking up to paintpartyfriday because i just don't get around to visiting everyone there, and i felt guilty linking and running. I really didn't say it just to get people to tell me not to go, but since some if you did tell me not to go, here I am again this week... Happy PPF!


Friday, August 28, 2015

Mandala on a T-shirt

I wanted to try to use up some fabric paint and see how this would work on a shirt....so I cut some shapes from craft foam and glued them to pill jars for stamps....


Friday, February 13, 2015

2 little valentines books for my daughters

There are a million tutorials out there for making little books.... But I will still show you what I did. I cut 3 papers that were 1" x 2". Then I cut a piece of card stock about a 1/2" larger and scored a strip down the middle.


 Then I rounded the edges with a punch stamp. And I painted a heart on the front and sewed on a sequin star.


 I glued the marbled paper I made months ago to the back of the card stock...
Then I glued in family photos, and added the words " always remember, you are loved by so many."


And the last thing was to sew the 3 folded pages into the spine of the painted cardstock, and cover those threads with a thin strip of duct tape on the outside spine. Done.

There is just something so special about a tiny book!
Happy valentines day!

Thursday, December 11, 2014

monoprinting on a sweatshirt

 I have been wanting to try mono printing for awhile and decided to add some feathers to a sweatshirt that way. I painted the shape of a feather on wax paper using regular cheap black acrylic paint mixed with a little bit of paint extender, then I quickly drew lines into the feather shape and stamped it onto the sweatshirt. I redid this two more times using the same spot on the wax paper so my feathers would be the same, and then added a few little ones down the sleeve. . I love it and have washed it a few times already with out it coming out. The layer of paint seems to be thin enough to not be stiff on my shirt either.
Simple project.
Happy project.


And I had a shop, Meeliki, add me into one of their treasuries. It is the prettiest treasury I have seen in a while so I had to share it. You can click any item to go to their shop on etsy.


'Grey' by Meeliki


WILDFLOWER, minimalist, quee...
$24

Natural softened linen pillo...
$55

Christmas Sale Linen Table C...
$44.79

paynes grey mandala watercol...
$35

Ornate Tribal Drop Earrings
$120

Horse watercolor, Animal art...
$85

Golden brass adjustable flor...
$19

Winter's Cloak - Print
$20

The COCOON 3D Silver Plated...
$196

Autumn Macro Signed Print, A...
$30

Still Life Photography Dried...
$25

Natural Skeleton Leaves - Pr...
$2.95

Original Watercolor Archival...
$40

Decorative Pillow, Felt Cush...
$89

hedgehog "lump" gi...
$69

HOLIDAY SALE Sterling Silver...
$32.2
Powered By Handmadeology